
Believable AI characters are not a style adjective. They are a small set of habits: one clear character sheet, skin that is allowed to be uneven, light you can point at, a camera that knows its shot size, and motion that obeys weight, grip, and breath.
This playbook folds the official NeuroHelper AI Realism Playbook together with the earlier Realism Blueprint — the same craft, one URL. You work in one workspace: Chat Master for the brief, Image Master for the sheets, Video Master for the scene. Watch the walkthrough, then use the stills below as storyboard references, not as full-width hero images.
What “real” looks like in stills
Playbook / Storyboard frames from the official sheets
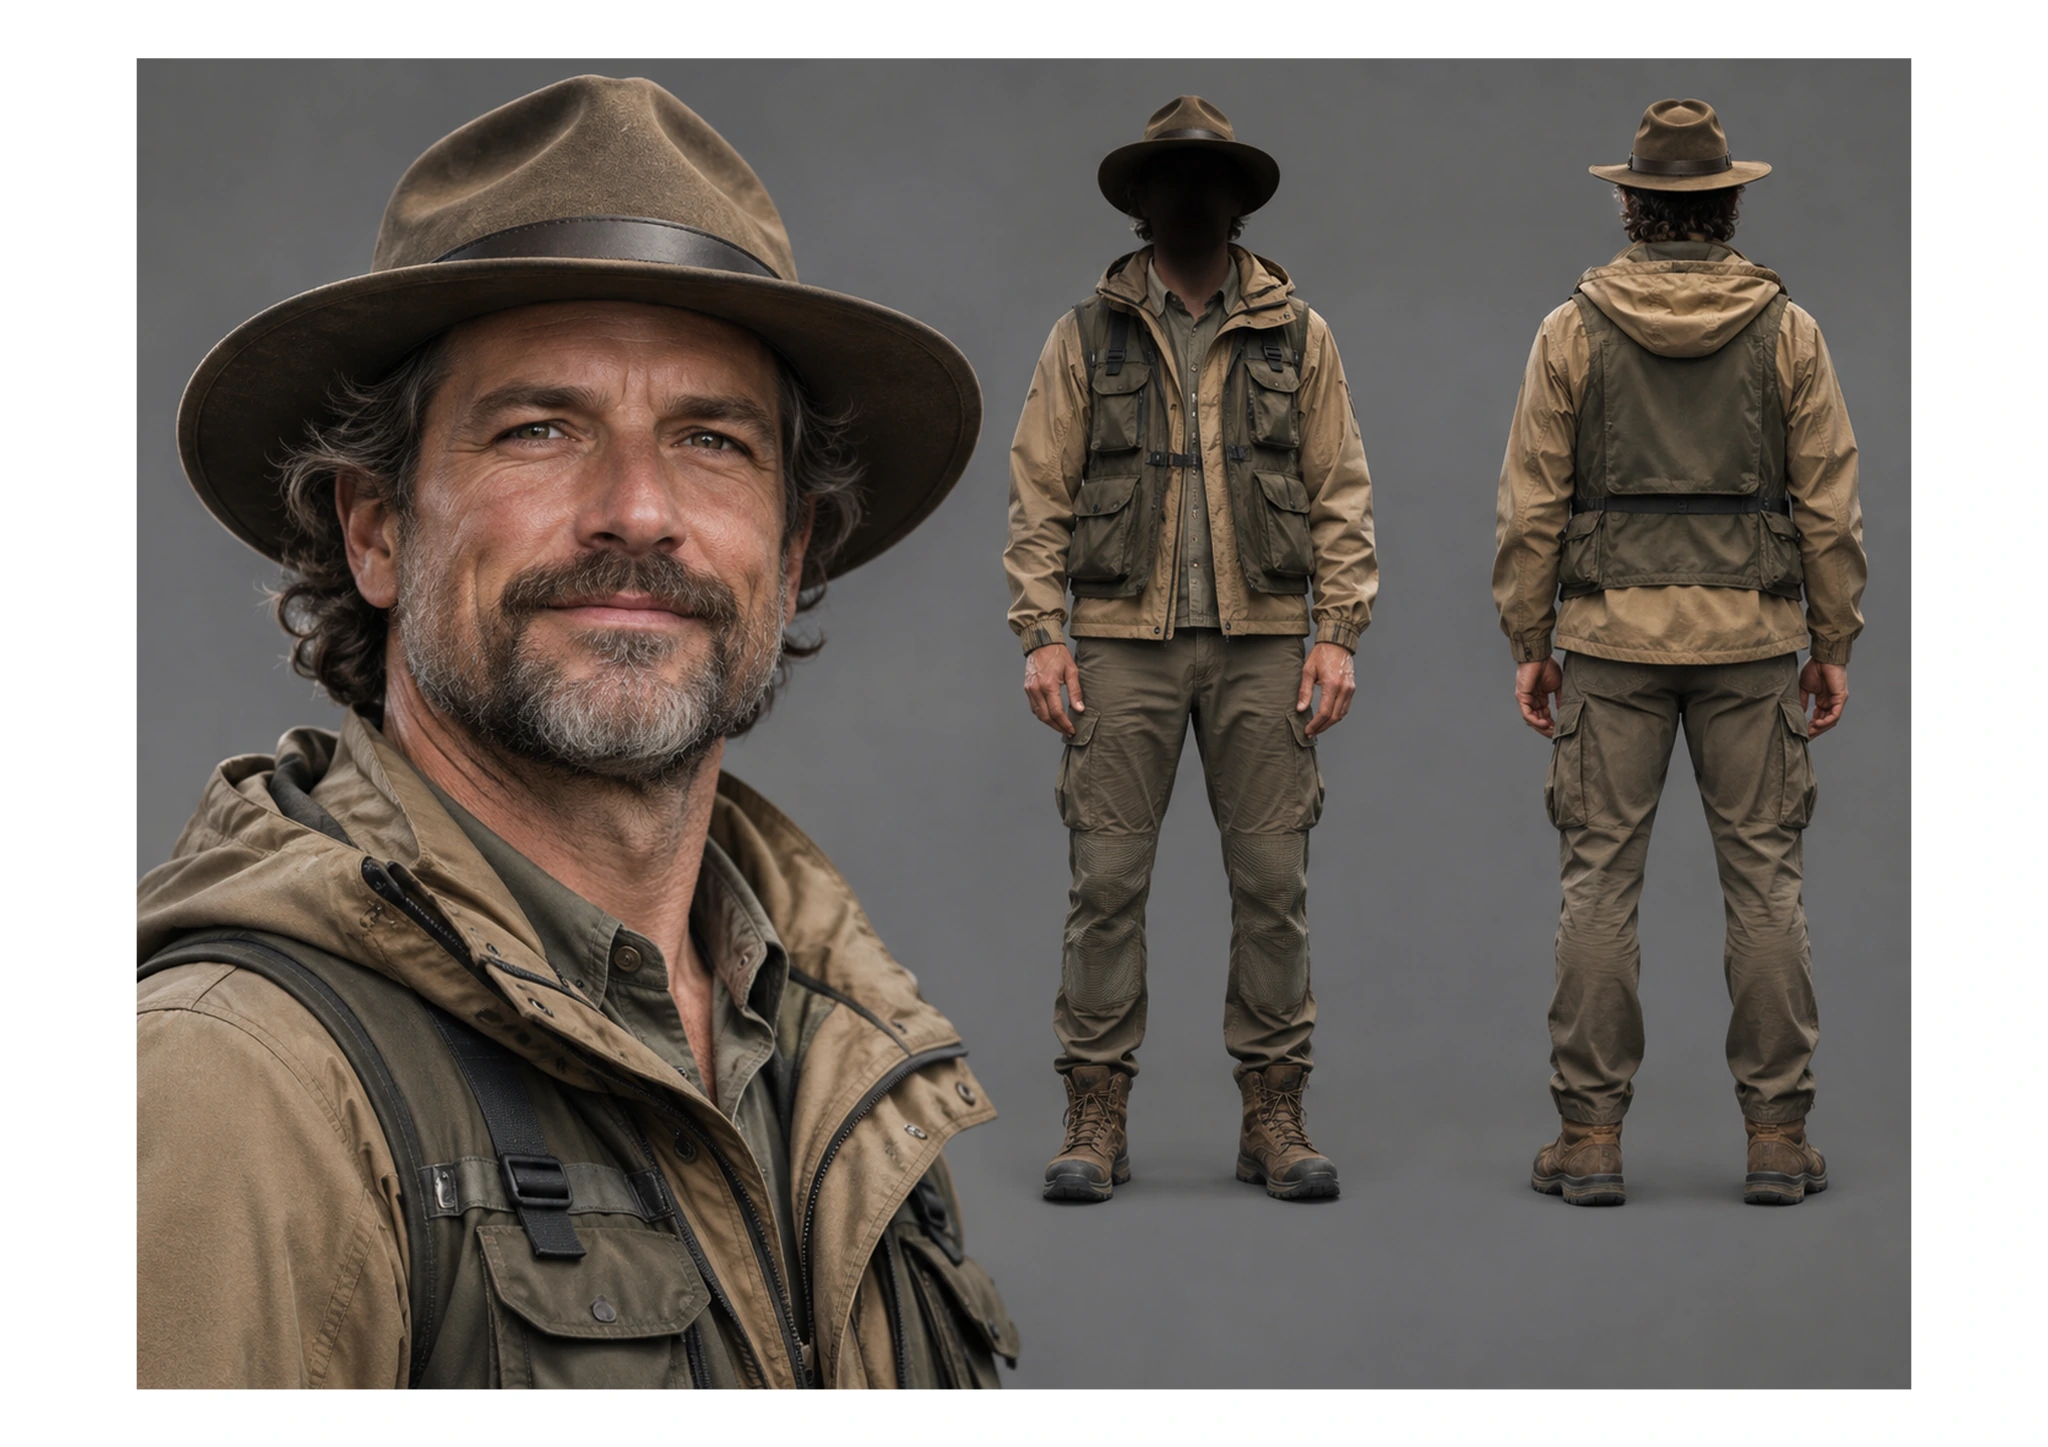 01 Sheet
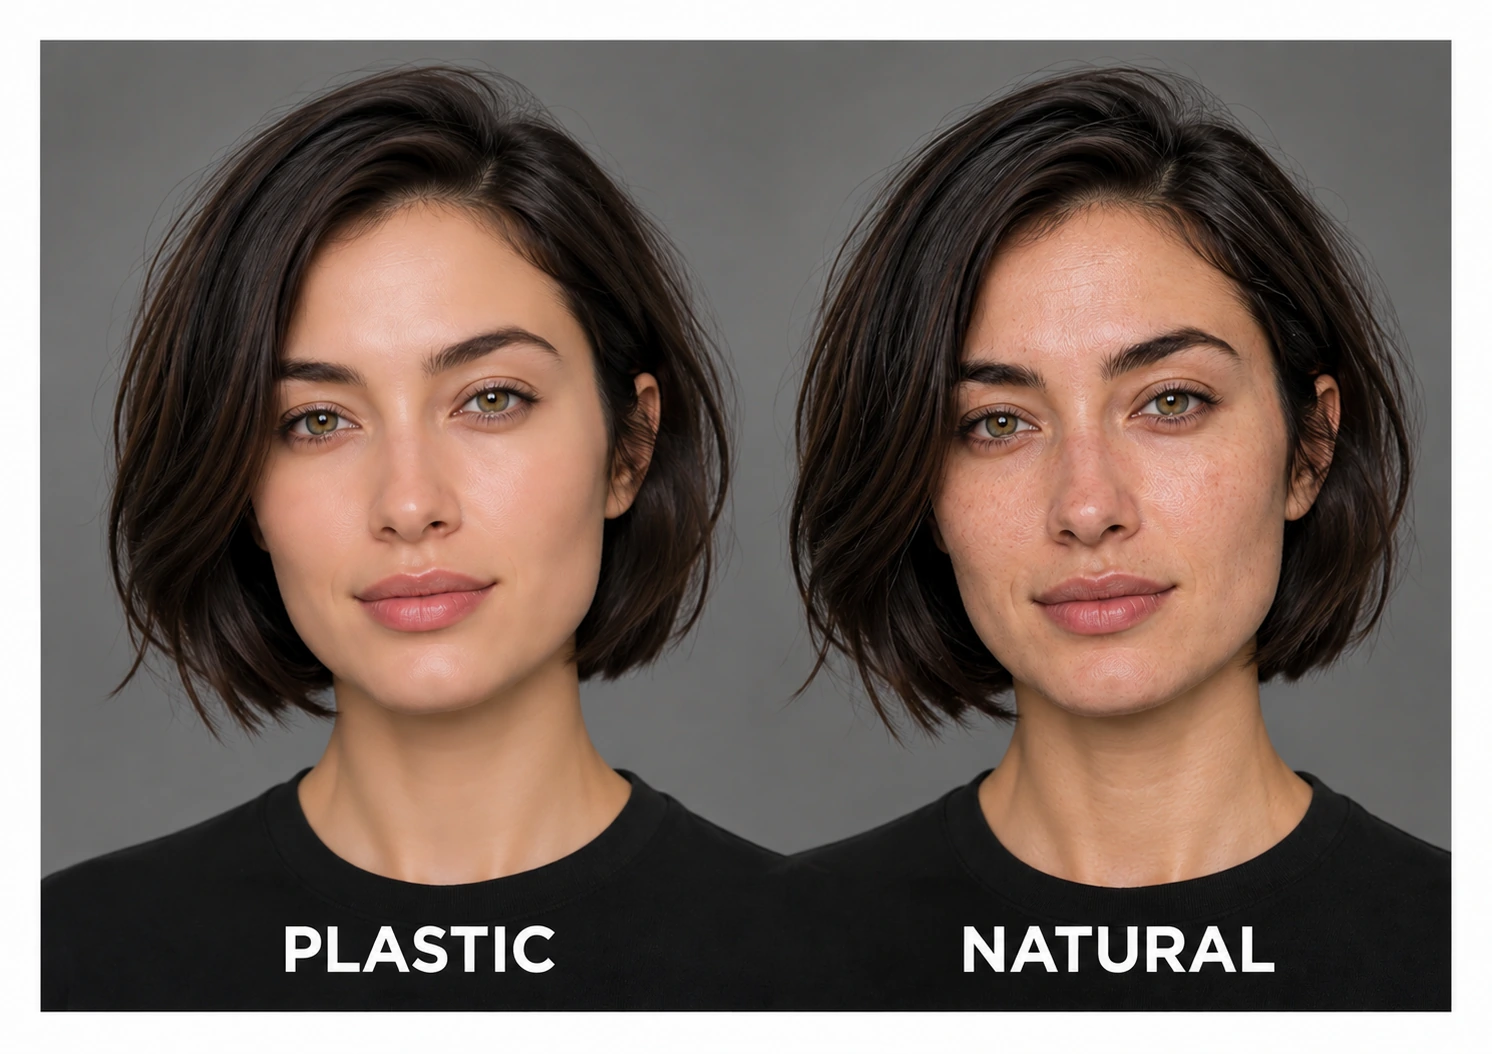 02 Skin
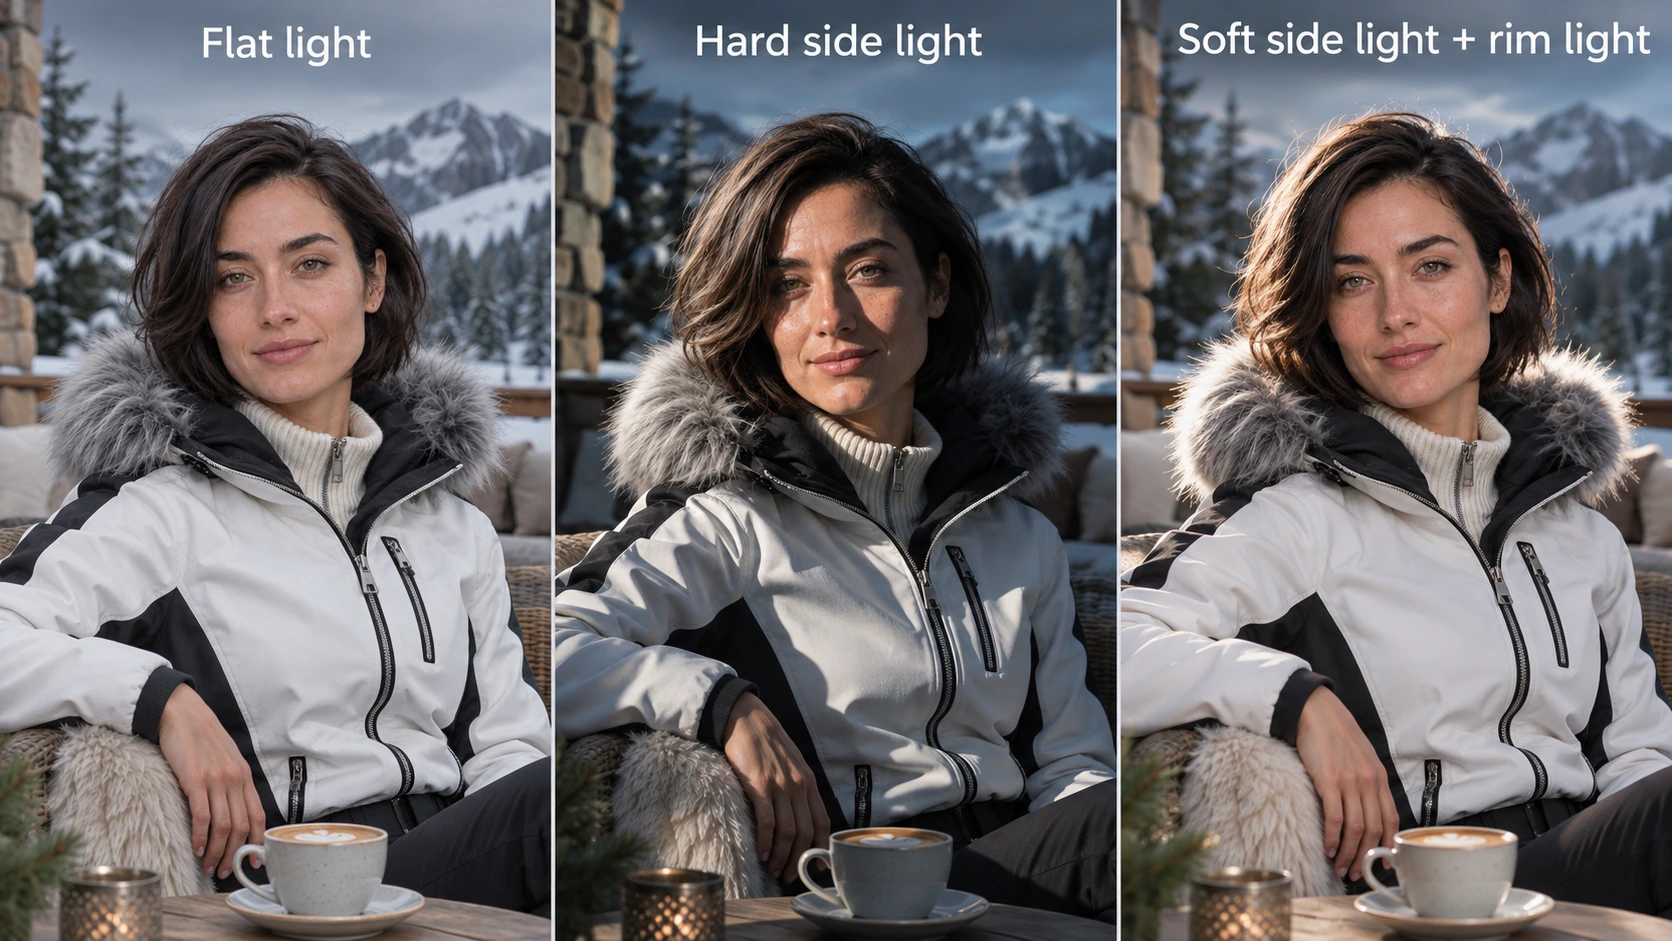 03 Light
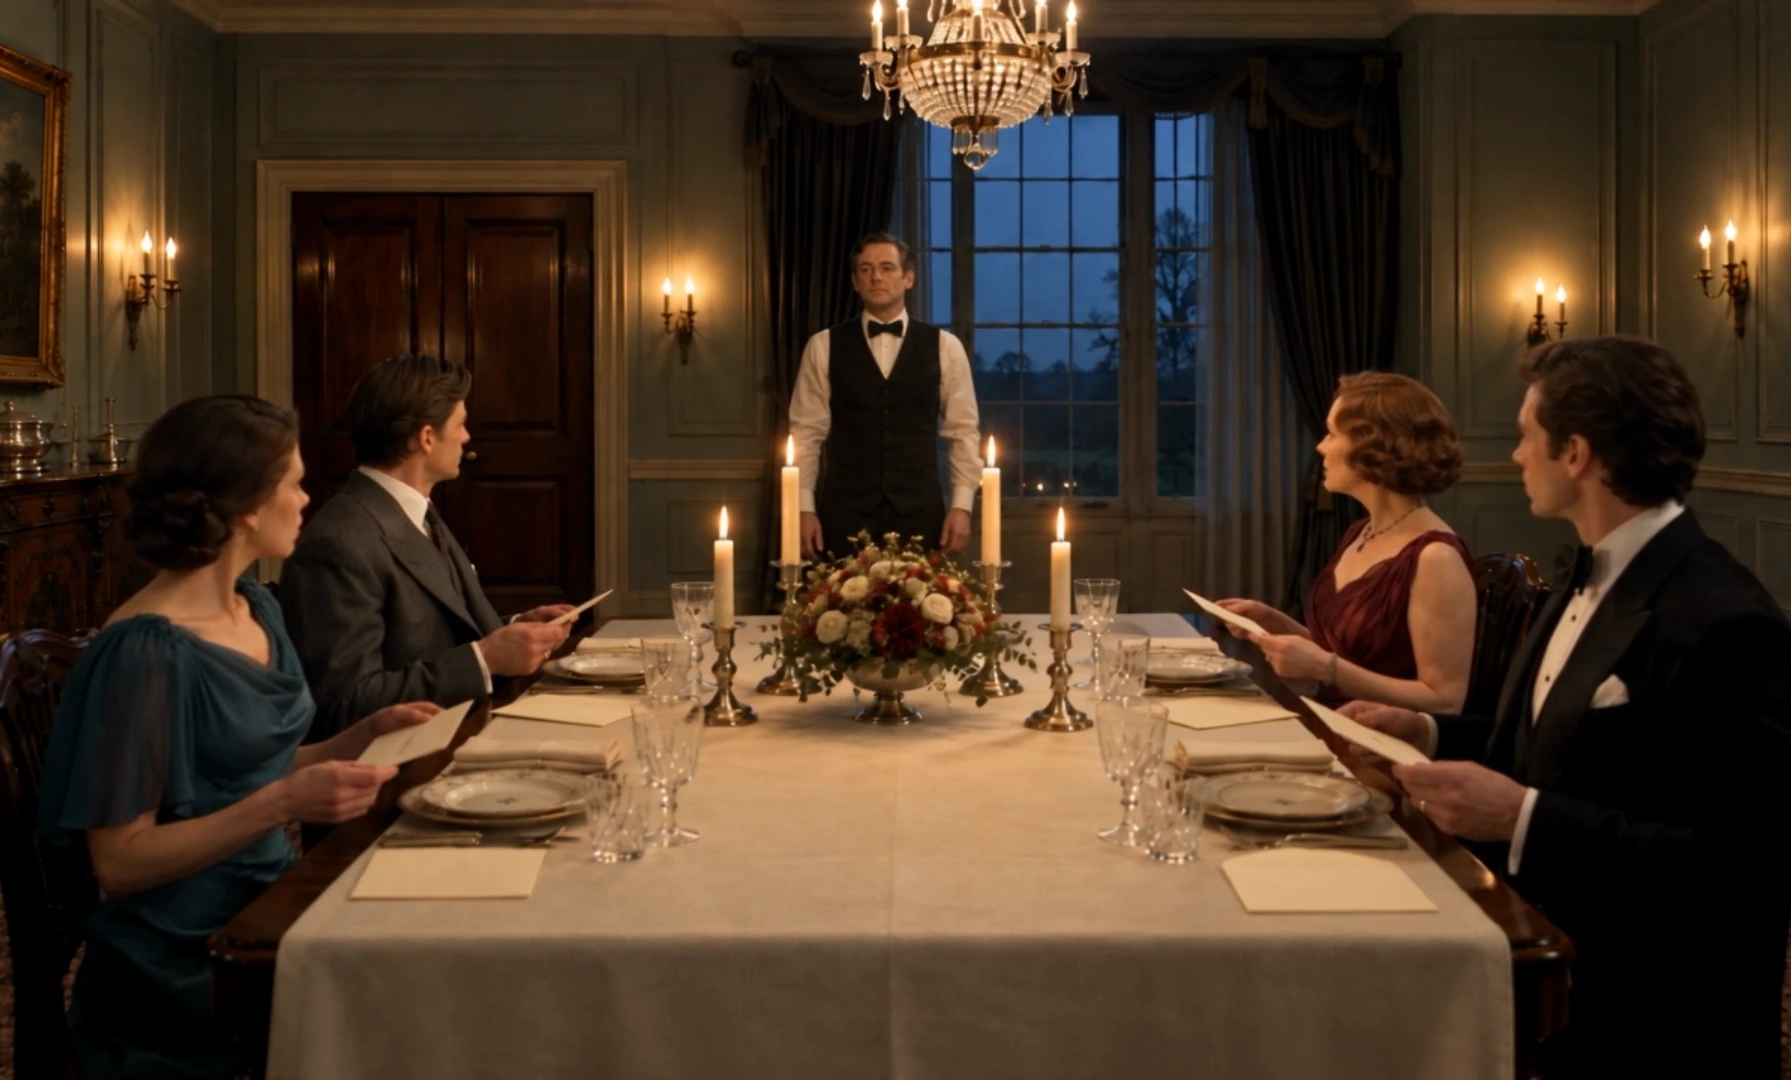 04 Scene
The workflow: Build one 16:9 character sheet → rewrite skin and light as concrete descriptions → plan shot size and one camera move → generate video with motion, props, and sound that have a source → check sharpness, continuity, and physics before you regenerate.
1. Build a simple character sheet
One large face is easier for a model to follow than a contact sheet of tiny angles. Use a horizontal 16:9 frame with exactly three views of the same person: a large, detailed facial portrait; a full-body front view; and a full-body back view. Keep clothes, shoes, and hairstyle identical. If the front view’s face is tiny, you can mask it so the model attends to the large portrait — keep hair and clothing visible. A medium gray or beige background usually shows light and clothing edges more clearly than pure white or black; treat that as a useful test, not a ban.
Create a horizontal 16:9 character reference sheet on a neutral gray background. Exactly three views of the SAME person: one large detailed facial portrait, one full-body front view with the small face hidden, and one full-body back view. Identical clothes, shoes and hairstyle in all three. Neutral, even lighting. No extra face angles, no text, no logos, no collage decorations.For a version of this sheet you will reuse as a social character, see how to create an AI influencer — that guide uses a two-panel 16:9 layout (portrait plus neck-to-shoes) and then Seedance 2.5 Video Edit. This playbook is the craft underneath both.
2. Natural skin, not a beauty filter
Plastic-looking skin is too smooth, shiny, and uniform. Natural skin has small uneven pores, slight color changes, fine lines under the eyes, soft facial hair, and natural asymmetry. Do not swing to the other extreme and carve in damage. Eyes and hair do as much work as pores: natural reflections that match the scene light, detailed irises, separate lashes, a few loose strands. Highlights should not float as bright, unmotivated dots.
Natural unretouched human skin, realistic irregular pores, fine lines, subtle uneven skin tone, authentic under-eye texture, tiny imperfections, slight facial asymmetry, natural lip texture, individual hair strands and realistic eye catchlights. Preserve the exact face and age. No beauty filters or waxy skin.When you compare treatments, keep the same face, expression, camera angle, and lighting. Change only the skin language. Current still models in Image Master include options such as GPT Image 2.6; pick one model and stay with it for a sheet so the face does not drift between versions. For how we evaluate outputs, see how we test AI models and the models hub.
3. Show the light, don’t just name it
A formula that actually steers a model is: light source + direction + softness + shadows + reflected light + effect on the subject. “Cinematic lighting” is vague. These starting points, from the official playbook, are creative — not universal camera law — and different models will interpret them differently:
- Flat light — even, easy to read, flatter faces.
- Hard side light — sharp shadows, dramatic contrast.
- Soft side + rim — natural depth; a thin highlight separates hair from the background. Example: soft side sunlight from camera-left at 45 degrees, gentle cool fill, subtle warm rim on hair, natural cheek shadows.
- High key / low key — bright open fill, or mostly dark with light only on what matters.
- Golden hour / moonlight — warm low sun and long shadows, or cool dim light that stays readable.
- Practicals / silhouette — a visible lamp, screen, or candle motivating the light; or a bright backlight with a dark, still-readable figure.
4. Camera, editing, and motion
A convincing video feels planned. Choose a shot size with intent: roughly 35 mm for an environment and two people, 50 mm for conversation and medium shots, 85 mm for faces and emotion. Keep screen direction: if she sits left and he sits right, they stay there; use shot/reverse-shot over each shoulder and do not cross the 180-degree line. In a short shot, one main camera move is easier to keep realistic than three at once. Describe the start and the end of the move.
0–3s: 35mm medium two-shot, woman screen-left, man screen-right.
3–6s: 50mm over-the-shoulder shot from behind the man, focusing on the woman.
6–9s: 85mm close-up of her reaction.
Preserve eyelines, camera axis, facial identity and the winter background.
That advice is the same spine as cinematic AI action videos: describe actions, not just adjectives. For complex action, split it into short readable beats. Small physical details then do the rest — correct fingers and contact; a cup that stays in the hand until it is put down; jackets that fold in wind or when someone sits; blinking, breathing, and changing expression instead of a mannequin smile. If the scene is winter, fine snow is almost silent, steam rises from drinks, and breath vapor appears only with some exhalations. Sound should have a source: fabric, wind, paper, a chair. Speak at a comfortable pace and match lips to words if there is dialogue. Finish audio in Audio Master when you need a cleaner bed than the native pass.
5. A held scene: the mystery dinner (from the Blueprint)
The earlier Realism Blueprint is not a second article. It is the playbook applied to one room: four guests, furniture that does not teleport, and a short lens sequence. Wide for the group, medium for a look across the table, portrait for hands opening an envelope. The three final checks still apply: sharpness (faces and important objects stay clear; avoid excessive bokeh), continuity (same people, outfits, geometry, light, and props), and believable physics (grips, weight, folds, contact).
Create a 16:9 photorealistic live-action shot. Use the attached character and environment references. Preserve the exact faces, clothing, furniture, lighting direction and positions.
0–3s: static 35mm wide shot, all four guests in clear focus.
3–6s: eye-level 50mm medium shot of one guest looking toward another.
6–9s: close-up of both hands carefully opening a paper envelope; realistic contact and paper motion.
Authentic blinking, breathing and small gestures. Deliberate hard cuts, natural room ambience, sharp faces, no anatomy errors or identity changes.
When you move from stills to motion, pick a current Video Master model that fits the shot — Seedance 2.5, Kling 4.0, and Wan 3.0 are live options; this playbook does not assign one model to the dinner still. Compare them in best AI video generators and Seedance vs Kling.
How to do this in NeuroHelper AI
- Chat Master. Turn a character idea into a sheet prompt, a lighting sentence, and a timed video brief.
- Image Master. Generate the 16:9 sheet and any environment still. Stay on one still model for a character you intend to reuse.
- Video Master. Attach the sheet (and environment), paste a brief with shot sizes and one move, then review sharpness, continuity, and physics.
- Audio Master. Add only sounds with a clear source, or a quiet room tone that does not fight the picture.
Apply the same habits in new camera angles, animating old photos, and short hooks — less motion is often more believable. If you work across tools today, the alternatives hub is a starting map, including Higgsfield.
Mistakes that read as “AI”
- A grid of tiny faces instead of one large portrait. The model no longer knows which face is canonical.
- Waxy beauty-filter skin, or the opposite — carved-in damage. Uneven, moderate texture is the goal.
- Light named but not placed. Say where it comes from and what it does to the cheek and hair.
- Three camera moves in a six-second shot. One move, then a cut, is usually more convincing.
- A cup that hovers, or eyes that never blink. Physics and micro-motion are the tell.
Watch the playbook, then run one check
A secondary, shorter walkthrough of the same craft is also on the official channel if you want a second pass at the idea. Use either film as a reminder, then generate one sheet and run the three final checks on a nine-second scene.
Frequently asked questions
What is the AI Realism Playbook?
A practical workflow for believable AI characters, images, and videos: a simple 16:9 character sheet, natural skin language, lighting you can actually describe, planned shot sizes and camera moves, and motion that obeys weight, grip, and breath. This article also folds in the earlier Realism Blueprint, including the mystery-dinner scene — there is no separate URL for the Blueprint.
Which models should I use for the sheet and the video?
The playbook is written around Chat Master, Image Master, and Video Master, not around a single mandatory model. Use one still model consistently for a character you will reuse, and pick a current Video Master option such as Seedance 2.5, Kling 4.0, or Wan 3.0 based on the shot. Confirm settings in the picker before you generate.
Why not put many face angles on the character sheet?
One large face is easier for a model to follow than a grid of tiny faces. The official sheet is three views: a large portrait, a full-body front, and a full-body back, with identical clothes and hair.
How do I stop plastic or waxy skin?
Ask for natural unretouched skin: irregular pores, slight uneven tone, fine lines, subtle asymmetry, and eye highlights that match the scene lighting. Avoid beauty-filter language and also avoid extreme damage. Compare treatments only by changing the skin description.
Is there a second YouTube video for this playbook?
The primary embed is N2QBLW5XEK0. A related official video, b0DVl9OmHlc, covers the same realism craft and can be used as a secondary reference; it is not embedded here, so the page has one canonical film.
How much does a realism test cost in NeuroHelper AI?
It depends on the models, durations, resolutions, and references you choose. Image Master and Video Master show the current estimate before you generate. You can start with a $1 trial, then choose Basic $19 or Pro $49.